
3.6.3. Gbasf2#
Gbasf2 is the command-line client for submitting grid-based basf2 jobs.
Belle II data and MC samples are distributed in many storage sites around the world.
Gbasf2 and a set of grid-based user tools (gb2 tools) allow you to access and
analyze them.
The same basf2 steering files are used when running on the grid. The usual workflow is:
Develop a
basf2steering file.Test it locally (don’t skip this step!).
Locate your input files on the grid.
Submit jobs to the grid with the same
basf2steering file.Download the output to perform offline analysis (plots, fits, etc.).
Warning
Before getting started, make sure you understand the following:
The GRID is NOT a local computing system like KEKCC.
Once you submit jobs, they will be assigned to computing systems around the world.
If your job is problematic, it will be distributed to the world and many sites will be affected.
Remember, always test your jobs locally before submitting to the grid!
Go to computing getting started and verify that you have the prerequisites. You need:
Access to KEKCC or NAF (recommended), or to a system with EL9 and CVMFS mounted.
A valid grid certificate issued within a year and installed in
~/.globusin.pemformat.Belle Virtual Organization (VO) membership registered or renewed within a year. You can check your status at VOMS server.
Registration in DIRAC.
Note
It is required that you join the comp users forum, where you can ask for help and receive announcements on releases and system issues. You can also find more details in the official gbasf2 documentation
Setting up gbasf2 via cvmfs#
Since the DIRAC user interface relies on some middleware components, this limits the operating environments in which gbasf2 can function. At this moment, only EL9/Rocky9/AlmaLinux9 are guranteed support (CentOS 7 is now being phased out).
Also, unfortunately at this moment the basf2 and gbasf2 environments are not compatible. This means gbasf2 requires
a fresh ssh session (without sourcing b2setup).
Note
Be sure that the userkey.pem has the rw permissions only for the owner and no permission to the others.
You should see -rw------- with ls -l ~/.globus/userkey.pem. Otherwise, use
chmod 600 ~/.globus/userkey.pem
If your computing system has access to cvmfs (e.g. at KEKCC), the simplest way to use gbasf2 is via a central installation. The following command sets all the necessary environment variables and initializes a grid proxy for you (you will be asked to enter your credentials for this).
source /cvmfs/belle.kek.jp/grid/gbasf2/pro/bashrc
It will request your certificate passphrase. If the command finishes without errors and you see information related to your certificate, similar to that below, your proxy has been successfully set:
Proxy generated:
subject      : /C=JP/O=KEK/OU=CRC/CN=USERNAME
issuer       : /C=JP/O=KEK/OU=CRC/CN=USERNAME
identity     : /C=JP/O=KEK/OU=CRC/CN=USERNAME
timeleft     : 23:53:58
DIRAC group  : belle
rfc          : True
path         : /tmp/x100up_u0001
username     : youruser
properties   : NormalUser
VOMS         : True
VOMS fqan    : ['/belle']

Succeed with return value:
0
That’s it! You are ready to run grid jobs!
A proxy is a short-term credential that verifies your identity, allowing you to perform operations on the grid.
By default your proxy is valid for 24h. If it expires, you need to execute gb2_proxy_init -g belle again
if you have already setup gbasf2 in the same shell (terminal).
Note
You can also pass arguments when setting up gbasf2, e.g. if you need to setup a grid proxy with permissions beyond the default user (with option -g).
Installing gbasf2#
The pre-installed gbasf2 on CVMFS is the recommended version (see Setup Gbasf2). However, gbasf2 local installation is available. Please be aware this is not fully tested and not fully supported. If you wish to install gbasf2 locally, follow the instructions on the gbasf2 documentation.
See also
Locating datasets on the grid#
The most common task as user of the grid is the submission of jobs with input files
From the official Belle MC campaigns.
From the official data reprocessing and skims.
Files are stored around the world in the different storage elements. Fortunately, as users, you don’t have to worry about the physical location. A file catalog keeps the record of where the files are located, and you just need to provide a logical identifier of the samples of interest for your analysis.
Datasets and Datablocks#
A logical file name (LFN) is the unique identifier of a file in the Belle II grid in the form of a unix-like file path (starting always with /belle):
/belle/data_type/some_more_directories/dataset/datablock/file
A replica catalog resolves the LFN, and provides the information of where to find the files. Then, you only need to provide the LFN(s) relevant for your analysis, without dealing with the physical location of the samples.
Files are classified inside datasets. Examples of LFNs for datasets are:
# An mDST dataset of data from exp 18
/belle/Data/release-06-00-08/DB00002392/proc13/prod00029531/e0018/4S/r00000/mdst

# A uDST dataset of data from exp 18
/belle/Data/release-06-01-11/DB00002058/proc13/prod00029781/e0018/4S/r01394/hadron/14120601/udst

# An MC sample of charged B mesons
/belle/MC/release-06-01-08/DB00002649/MC15rd_b/prod00027830/s00/e0026/4S/r01950/charged/mdst
By design, a directory on the grid can only contain 1000 files at most. For this reason, the concept of datablock
is introduced. Each dataset is subdivided by directories with name subXX, where the last two digits are sequential
(sub00, sub01, ...).
Key points
By design, each datablock contains a maximum of 1000 files.
If a dataset contains more than 1000 files, it will be subdivided into at least two datablocks.
The command-line tool for listing the content of a directory on the grid is gb2_ds_list
(it is equivalent to ls on your local system). You can use it to see how many datablock(s) is/are contained
in each dataset.
Tip
All the gbasf2 command-line tools (sometimes called gb2 tools) have the flags --help
and --usage to see all the available options.
Exercise
Use gb2_ds_list to see how many datablock(s) is/are contained in the skimmed dataset
/belle/Data/release-06-01-11/DB00002058/proc13/prod00029825/e0018/4S_offres/r02559/hadron/14120601/udst
Hint
Remember to set your gbasf2 environment first, otherwise the tool will not be found.
Solution
Executing gb2_ds_list /belle/Data/release-06-01-11/DB00002058/proc13/prod00029825/e0018/4S_offres/r02559/hadron/14120601/udst
will show you that the dataset contains 1 datablock, sub00.
Note
Sometimes, in the documentation (such as in the XWiki pages) we refer to the logical path name (LPN) of datasets and datablocks, while for files we use LFN. In practice, LFN and LPN are the same thing.
Collections#
Rather than expect every analyst to discover the data and MC samples useful for analysis by themselves,
the data production team prepares collections of LFNs. This provides a common, immutable, intuitive resource,
which can help to avoid errors related to missing or using incorrect samples for an analysis. You can discover
collections in the same way as for LFNs.
To discover the collection you need, you should first check Data main page and MC main page, which provide details for the official collections.
If you want to explore the available collections, you can also use the dataset searcher tool. You’ve already
used the gb2_ds_search tool to search for datasets. Now use the collection
key word to list the available data collections.
Exercise
- Set your gbasf2 environment and find the available data collections for Moriond2023 using
Hint
Use --help and --usage to get all the available options
Solution
The execution and result from the command line are as follows:
gb2_ds_search collection --list_all_collections /belle/collection/Data/* | grep Moriond2023
Note
gb2_ds_search collection --list_all_collections expects input of the form /belle/collections/<type>/*, where <type is Data or MC. To filter
your search further, you can search for keywords by using grep, as shown in the solution above.
You can also do things like list the datasets within a collection with gb2_ds_search collection --list_datasets <COLLECTION>
and get the metadata for the collection with gb2_ds_search collection --get_metadata <COLLECTION>.
Key points
Collections contain a complete sample of a particular type, e.g. the Moriond 2023 data sample
You should always refer to the data production pages to find the recommended collections.
The Dataset Searcher#
Note
Unless recommended by experts (or you’re an expert yourself), the following section is something that contains very useful information but should be used with caution and wherewithal.
The Dataset Searcher is a web application to find datasets on the grid. Go to the DIRAC webportal and then open Menu (the icon at the left-bottom) -> BelleDIRAC Apps -> Dataset Searcher.
You have the option of searching between data or MC, samples with beam background (BGx1) or without (BGx0), and several other fields to refine your search. Play with all the available options and get familiar with them.
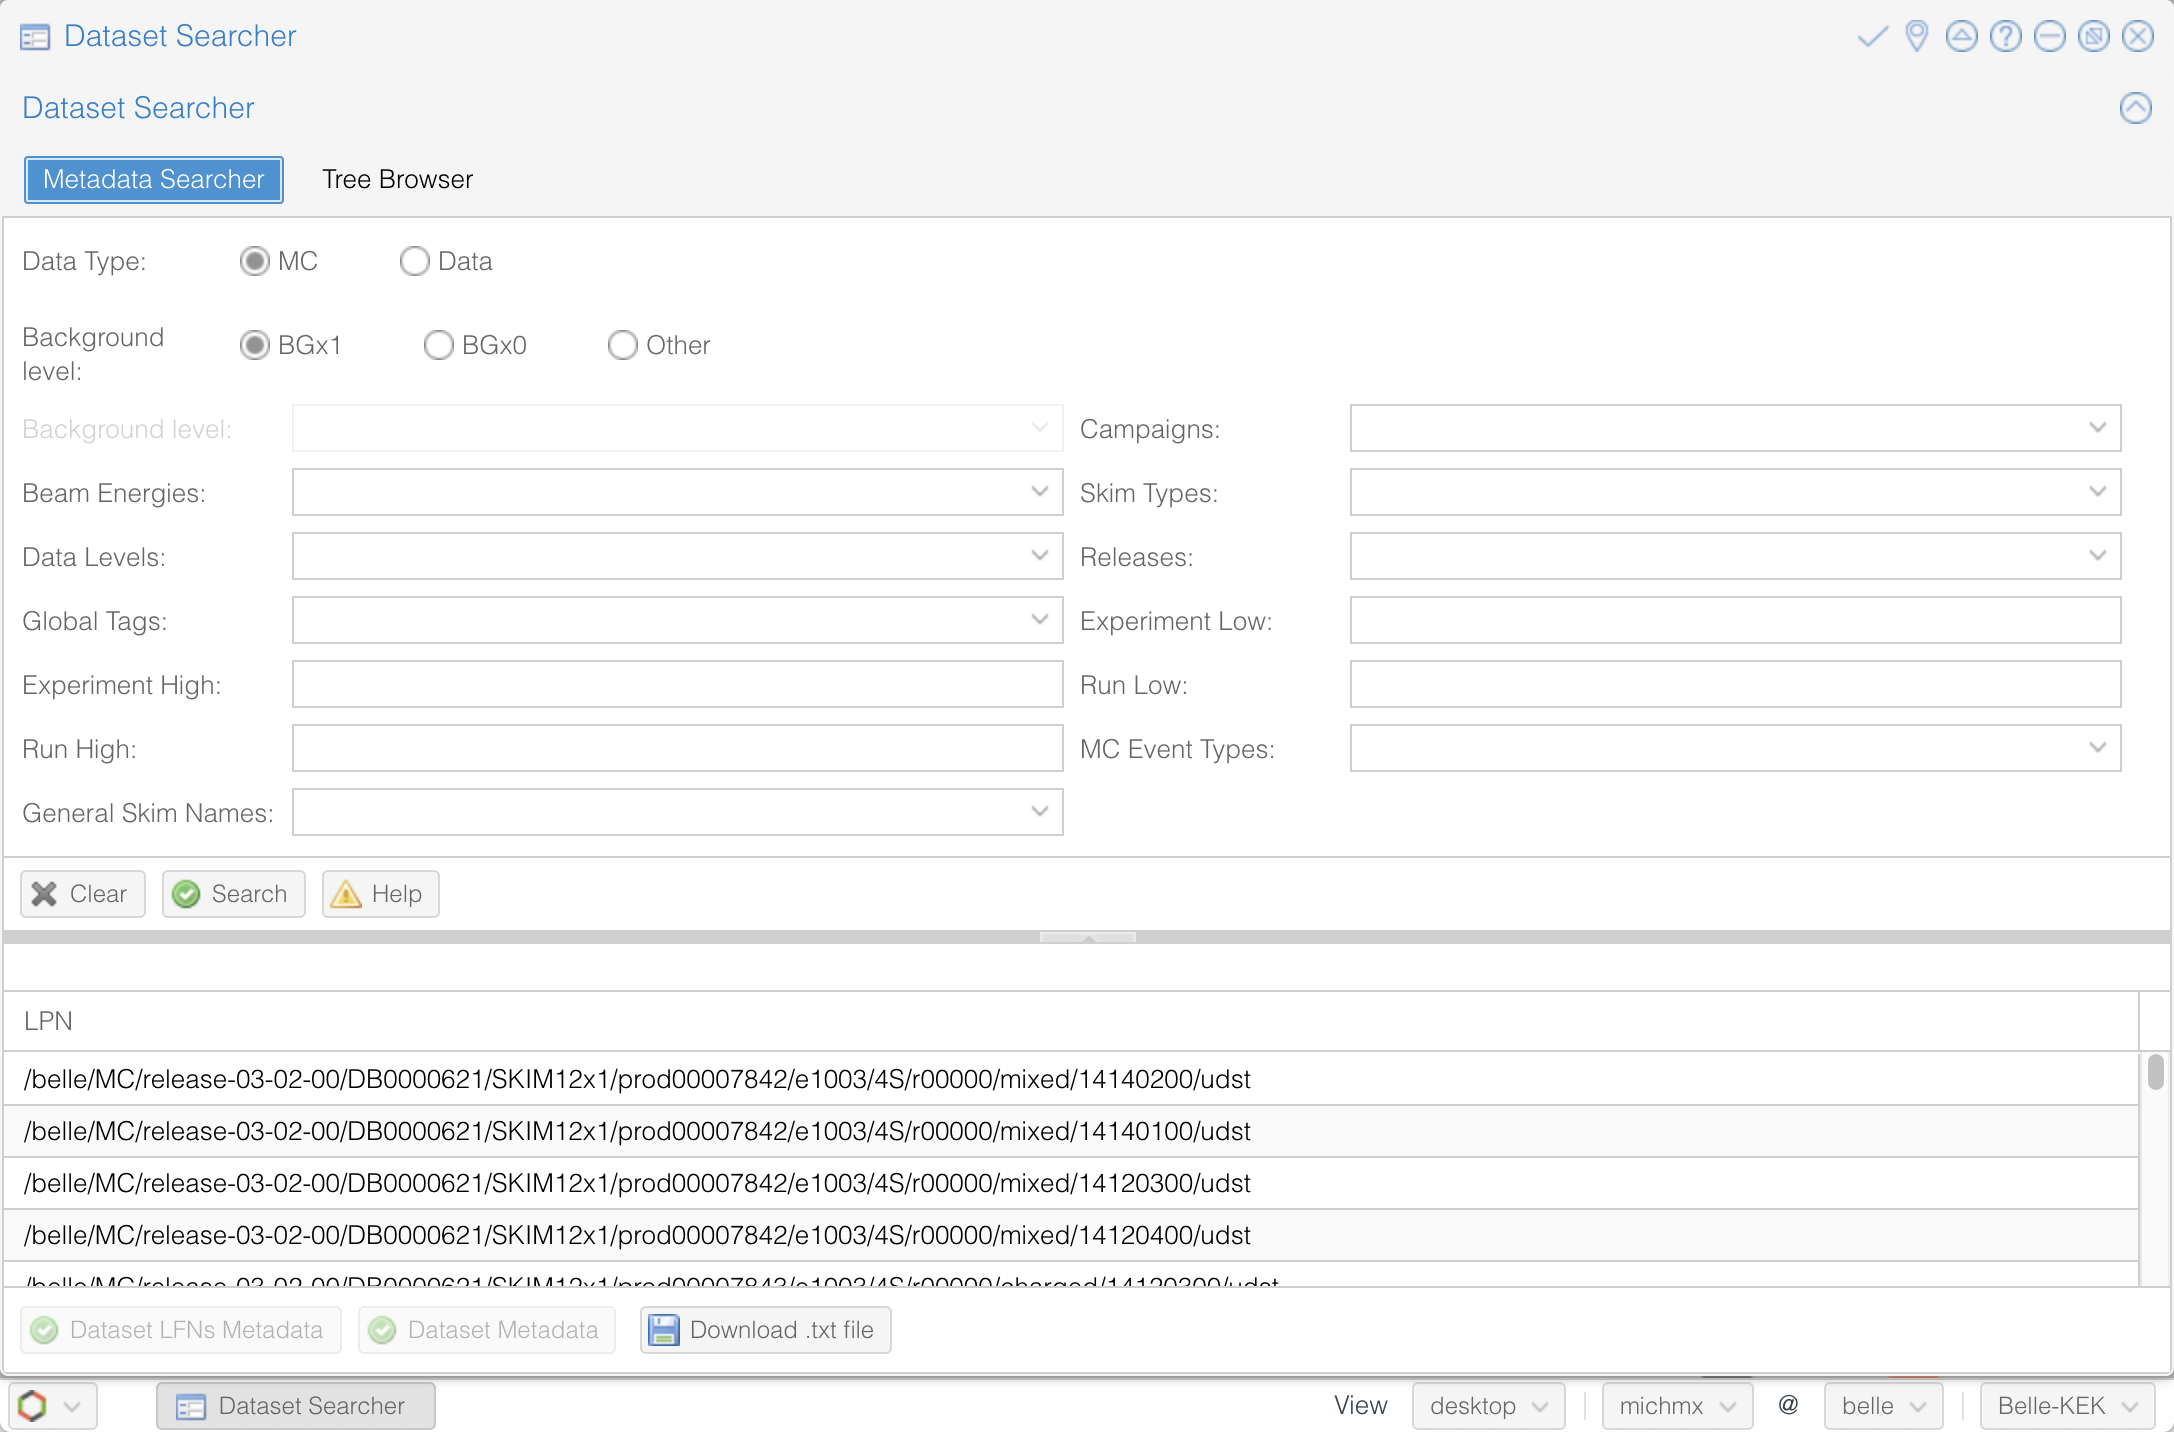
Fig. 3.33 The Dataset Searcher at the DIRAC web portal.#
Note
Accessing the DIRAC web portal requires that your user certificate is installed in your web browser. See computing getting started for details.
The MC Event types box show, by default, the generic samples available (charged, mixed, uubar, etc.).
If you want to search
signal samples, you need to specify the signal event type.
Also, if you want to search uDST skim samples - which are what we will be using in the examples - you can find them at
Skim registry section in the basf2 software documentation.
Note
Here, and in some of the exercises/examples to follow, we will be using the data-level format known as uDST. uDSTs (short for user Data Summary Table) is a format type that results from performing analysis skims on an input dataset (usually of mDST format) that reduces the size of the input dataset to a more manageable size by applying certain selection cuts. By doing this, the uDST contains a select amount of events from the input dataset that can be useful for a certain type of analysis.
Note
For further information about uDST skims, including the skim code and the decay name associated with that code,
see the basf2
skim registry.
Exercise
Open the Dataset Searcher and obtain the first LFN you see with an MC Event type of mixed from the
uDST skim sample for the decay mode B0 -> [D- -> K_S0 pi-]pi+, with beam background (BGx1) in the simulation.
Hint
Search the basf2
skim registry and look
at the skim codes and names.
Another hint
The skim code is 14120601.
Solution
The first LFN shown with an MC Event type of mixed for skim code 14120601 is
/belle/MC/release-04-02-00/DB00000898/SkimM13ax1/prod00013006/e1003/4S/r00000/mixed/14120601/udst.
Tip
You can download a list of LFNs from the Dataset Searcher using the button “Download txt file” at the bottom.
Another way to interact with the dataset searcher is using the command line tool gb2_ds_search.
Exercise
Set your gbasf2 environment and try to get the LFNs of MC uubar samples using the same skim code from the
decay mode above (14120601), and using campaign MC15rd_b along with beam energy of 4S and background
level BGx1 using gb2_ds_search.
Hint
Use --help and --usage to get all the available options
Solution
The execution and result from the command line are as follows:
gb2_ds_search dataset --data_type mc --skim_decay 14120601 --campaign MC15rd_b --beam_energy 4S --mc_event uubar --bkg_level BGx1

Matching datasets found:
/belle/MC/release-06-01-11/DB00002058/MC15rd_b/prod00030843/s00/e0007/4S/r00000/uubar/14120601/udst
/belle/MC/release-06-01-11/DB00002058/MC15rd_b/prod00030871/s00/e0008/4S/r00000/uubar/14120601/udst
/belle/MC/release-06-01-11/DB00002058/MC15rd_b/prod00030899/s00/e0010/4S/r00000/uubar/14120601/udst
/belle/MC/release-06-01-11/DB00002058/MC15rd_b/prod00030927/s00/e0012/4S/r00000/uubar/14120601/udst
/belle/MC/release-06-01-11/DB00002058/MC15rd_b/prod00031011/s00/e0017/4S/r00000/uubar/14120601/udst
/belle/MC/release-06-01-11/DB00002058/MC15rd_b/prod00031095/s00/e0022/4S/r00000/uubar/14120601/udst
/belle/MC/release-06-01-11/DB00002058/MC15rd_b/prod00030955/s00/e0014/4S/r00000/uubar/14120601/udst
/belle/MC/release-06-01-11/DB00002058/MC15rd_b/prod00031151/s00/e0024/4S/r00000/uubar/14120601/udst
/belle/MC/release-06-01-11/DB00002058/MC15rd_b/prod00031123/s00/e0022/4S/r00000/uubar/14120601/udst
/belle/MC/release-06-01-11/DB00002058/MC15rd_b/prod00032932/s00/e0020/4S/r00000/uubar/14120601/udst
/belle/MC/release-06-01-11/DB00002058/MC15rd_b/prod00032922/s00/e0018/4S/r00000/uubar/14120601/udst
/belle/MC/release-06-01-11/DB00002058/MC15rd_b/prod00032908/s00/e0016/4S/r00000/uubar/14120601/udst
/belle/MC/release-06-01-11/DB00002058/MC15rd_b/prod00032954/s00/e0026/4S/r00000/uubar/14120601/udst
/belle/MC/release-06-01-11/DB00002058/MC15rd_b/prod00032969/s00/e0026/4S/r00000/uubar/14120601/udst
Submit your first jobs to the Grid#
As mentioned before, gbasf2 uses exactly the same steering files of basf2 to submit jobs to the grid. The basic usage is
gbasf2 <your_steering_file.py> -p <project_name> -s <available_basf2_release>
where project_name is a name assigned by you, and available_basf2_release is the available basf2 software
version to use.
Note
The maximum length for a project name is 32 characters and the project name must be unique and cannot ever be reused, even if the project is deleted. One way to avoid problems with these restrictions is to use a short label and the date (eg. YYMMDD), for example B2JpsiKs_4Sdata_240119.
Warning
Do not use special characters in the project names ($, #, %, /, etc.),
it could create problems with file names in some sites and in the databases
(we allow only [^a-zA-Z0-9+-_]).
Once you located the dataset to use for your analysis, you can specify the LPN of the dataset to use as input
with the flag -i.
Note
The Dataset Searcher provides the LPN for datasets which gbasf2 can use as input when submitting jobs.
Prior to the latest releases of BelleDIRAC, there was a need to append sub00, sub01, ... to the LPNs provided
by the Dataset Searcher, but datablocks are now automatically appended to the dataset LPN when jobs are submitted.
You can, if you wish to use only one datablock, append to the end of the dataset LPN the datablock of your
choosing, but this is no longer strictly required.
Everything clear? Ok, let’s submit your first jobs.
Warning
Remember: you must carefully check your jobs with a local computing system, e.g. KEKCC, before you submit jobs to GRID.
Let’s use the steering file located at
~jbennett/public/gbasf2Tutorial/Reconstruct_Bd2JpsiKS_template.py on KEKCC (take a look at what it contains).
If we are interested in running over a generic uubar sample, then the LFN of one datablock is
/belle/MC/release-06-01-10/DB00002752/MC15rd_b/prod00029583/s00/e0018/4S/r00870/uubar/mdst/sub00.
With all this information, we are ready to submit the gbasf2 jobs, right?
STOP! Did you test the script locally first? Make sure it works before submitting to the grid!
Now that you’ve checked to make sure it works, let’s submit a gbasf2 project:
gbasf2 -p gb2Tutorial_Bd2JpsiKs_240101 -s light-2311-nebelung \
       -i /belle/MC/release-06-01-10/DB00002752/MC15rd_b/prod00029583/s00/e0018/4S/r00870/uubar/mdst \
       ~michmx/public/tutorial2020/Reconstruct_Bd2JpsiKS_template.py
A project summary and a confirmation prompt will be displayed after executing gbasf2
************************************************
*************** Project summary ****************
** Project name: gb2Tutorial_Bd2JpsiKs_240119
** Dataset path: /belle/user/jbennett/gb2Tutorial_Bd2JpsiKs_240119
** Steering file: /home/belle2/jbennett/public/gbasf2Tutorial/Reconstruct_Bd2JpsiKS_template.py
** Job owner: jbennett @ belle (16:29:58)
** Preferred site / SE: None / None
** Input files for first job: LFN:/belle/MC/release-06-01-10/DB00002752/MC15rd_b/prod00029583/s00/e0018/4S/r00870/uubar/mdst/sub00/mdst_000001_prod00029583_task17869000001.root
** Number of input files: 1
** Number of jobs: 1
** Processed data (MB): 840
** Processed events: 127516 events
** Estimated CPU time per job: 2126 min
************************************************
Are you sure to submit the project?
Please enter Y or N:
After verifying that everything is correct, you can confirm the submission.
Question
What is the the basf2 release in the example above?
Solution
The basf2 light release is light-2311-nebelung.
Tip
You can check which basf2 releases are available for running jobs on the grid using gb2_check_release.
Key points
A gbasf2 project can be submitted per dataset or per datablock.
If submitted per dataset, all datablocks within the specified dataset will be resolved.
The most useful way to submit an analysis project is using collections! Just use the collection path as the input argument. We won’t do that here, since the collections are quite large and you shouldn’t use them until you are ready to run a real analysis.
Inside the project, gbasf2 will produce jobs file-by-file according to the input.
The number of output files in the project will be equal to the number of files in the input.
Exercise
Submit a gbasf2 job with an steering file built by you in previous chapters of the book, for analyzing
a datablock of MC15rd_b, MC Event Types charged at center-of-mass energy 4S.
Use light-2311-nebelung of basf2.
Remember:
Prepare your steering file.
Search the input dataset.
Submit using gbasf2.
Hint
Use the Dataset Searcher to locate MC15rd_b datasets of MC Event Types charged.
Additional hint
The input dataset may be obtained using
gb2_ds_search dataset --data_type mc --campaign MC15rd_b --beam_energy 4S --mc_event charged
Next, choose one of the datasets listed after executing the command above and use that dataset with the command
gb2_ds_list <dataset_LPN> to see what datablock(s) are available in your chose dataset.
Recall that, if you wish to run over one specific datablock from a dataset, you can add sub00, sub01, ...
at the end of the dataset LPN.
Solution
gbasf2 -i /belle/MC/release-06-01-10/DB00002752/MC15rd_b/prod00029588/s00/e0018/4S/r00092/charged/mdst
-s light-2311-nebelung -p myFirstProject_240101 <your steering file>
Submit jobs with multiple LFNs#
As we have already stated, with the newest releases of BelleDIRAC, there is no longer a need to append the datablock
(sub00, sub01, ...) to the end of the dataset LPN. If you want (or need) to submit a project with several datablocks,
you can prepare a list of LFNs on a file and provide it to gbasf2 using --input_dslist.
Monitoring jobs#
There are two ways to monitor your jobs on the grid: command-line tools and the DIRAC web portal.
Monitoring in the terminal#
For the command-line tools, you can use gb2_project_summary
to have an overview of your project (The flag -p will specify the project name):
gb2_project_summary -p gb2Tutorial_Bd2JpsiKs_240119

       Project               Owner     Status    Done   Fail   Run   Wait   Submission Time(UTC)   Duration
==============================================================================================================
gb2Tutorial_Bd2JpsiKs_240119   jbennett   Running   0      0      1     0      2024-01-20 02:14:57    00:01:30
Tip
If no project name is specified, the tool will display information of your projects in the last month.
The gb2 tool gb2_job_status lists all the jobs running in a project, including the status and minor status:
gb2_job_status -p gb2Tutorial_Bd2JpsiKs_240119

5 jobs are selected.

 Job id     Status         MinorStatus        ApplicationStatus      Site
=============================================================================
387165066   Running   Application             Running             OSG.BNL.us

--- Summary of Selected Jobs ---
Completed:0  Deleted:0  Done:0  Failed:0  Killed:0  Running:1  Stalled:0  Waiting:0
Monitoring using the web portal#
The second way is looking at the job monitor in the DIRAC web portal.
Open the portal, click on the logo at the bottom-left and go to Applications/Job Monitor.
You have to click on ‘Submit’ to display the information.
You should see something like this:

Fig. 3.34 The Job Monitor at the DIRAC web portal.#
Tip
The Job Monitor includes many tools and features to track and manage your jobs, including a statistics panel (pie icon at the left-top). Get familiar with them.
Exercise
Monitor the jobs that you have submitted in the previous exercise. Wait until they finish successfully.
Hint
Do you see failed jobs? Go to the last section “Dealing with issues”.
Solution
Use the DIRAC web portal and open the Job Monitor. Jobs in green are in ‘Done’ status, while the failed ones are in red.
Downloading the output#
If all your jobs finished successfully (have status ‘Done’), then you can download the output.
The output files will be located below your user space (/belle/user/<username>/<project_name>).
You can check the output using gb2_ds_list <project_name>:
gb2_ds_list gb2Tutorial_Bd2JpsiKs_240119

/belle/user/jbennett/gb2Tutorial_Bd2JpsiKs_240119/sub00
Tip
To see the size of your output and its location, you can use the flags -l and -lg.
To actually download the files, use gb2_ds_get:
gb2_ds_get gb2Tutorial_Bd2JpsiKs_240119

Download 1 files from SE
Trying to download davs://dcbldoor.sdcc.bnl.gov:443/pnfs/sdcc.bnl.gov/data/bellediskdata/TMP/belle/user/jbennett/gb2Tutorial_Bd2JpsiKs240119/sub00/Bd2KpsiKs_00000_job387165066_00.root to /localhome/jvbennet/gb2Tutorial_Bd2JpsiKs240119/sub00/Bd2KpsiKs_00000_job387165066_00.root

Successfully downloaded files:
/belle/user/jbennett/gb2Tutorial_Bd2JpsiKs240119/sub00/Bd2KpsiKs_00000_job387165066_00.root in /localhome/jvbennet/gb2Tutorial_Bd2JpsiKs240119/sub00


Failed files:
Tip
You can enable download in multiple streams using the --new option of gb2_ds_get, which will speed up the transfer. At some point it will become the default behavior of gb2_ds_get.
Tip
Keep in mind: as far as you have a gbasf2 installation, you can submit jobs or download files from any machine.
Exercise
Download the output of your jobs submitted in a previous exercise. Verify that they are readable using ROOT.
Hint
First check that all your jobs finished successfully. Issues? Go to the next section.
Solution
Just use gb2_ds_get <your project name> (Easy, right?).
Dealing with issues#
Sometimes, things do not go well. A few jobs can fail because a large list of reasons, like
A timeout in the transfer of a file between sites.
A central service not available for a short period of time.
An issue in the site hosting the job.
A job took too long at a site
etc.
For users, consider the the following set of conditions:
condition1 = "Has it been less than a week?"
if condition1 is True: "Wait"
else:
    corollary1_1 = "Has it been assigned to a site?"
    if corollary1_1 is True: "Wait, we don't have control over the sites"
    else:
        corollary1_2 = "Have you set the cputime to your job?"
        if corollary1_2 is False: "Please consider resubmitting with cputime included"

condition2 = "Has it been longer than 2 weeks?"
if condntion2 is True:
    corollary2_1 = "Are all the jobs in the project stuck in 'Waiting/Not Finishing'?"
    if corollary2_1 is True: "Contact expert using comp_users_forum"
    else:
        corollary2_2 = "Is there a steady stream of jobs completing?"
        if corollary2_2 is True: "Please wait..."
        else: "contact expert"
Some of my jobs failed#
If you find that some of your jobs failed, most probably there was a temporal issue with your job or the site. You need to reschedule these jobs by yourself.
You can use gb2_job_reschedule -p <project name>:
gb2_job_reschedule --usage

Resubmit failed jobs or projects.
Only jobs which have fatal status (Failed, Killed, Stalled) are affected.
Exact same sandbox and parameters are reused. Thus you may need to submit different job if they are wrong.

By default, select only your jobs in current group.
Please switch group and user name by options.
All user's jobs are specified by '-u all'.

Examples:

% gb2_job_reschedule -j 723428,723429
% gb2_job_reschedule -p project1 -u user
Or you can use the job monitor in the DIRAC web portal, selecting the failed jobs and clicking the ‘Reschedule’ button.
All my jobs failed#
If all your jobs failed, most probably something is wrong with the steering file or the gbasf2 arguments (Did you test your steering file locally before submitting the jobs?).
A useful way to track which was the problem is (if possible) downloading the output sandbox. It contains the logs related to your job.
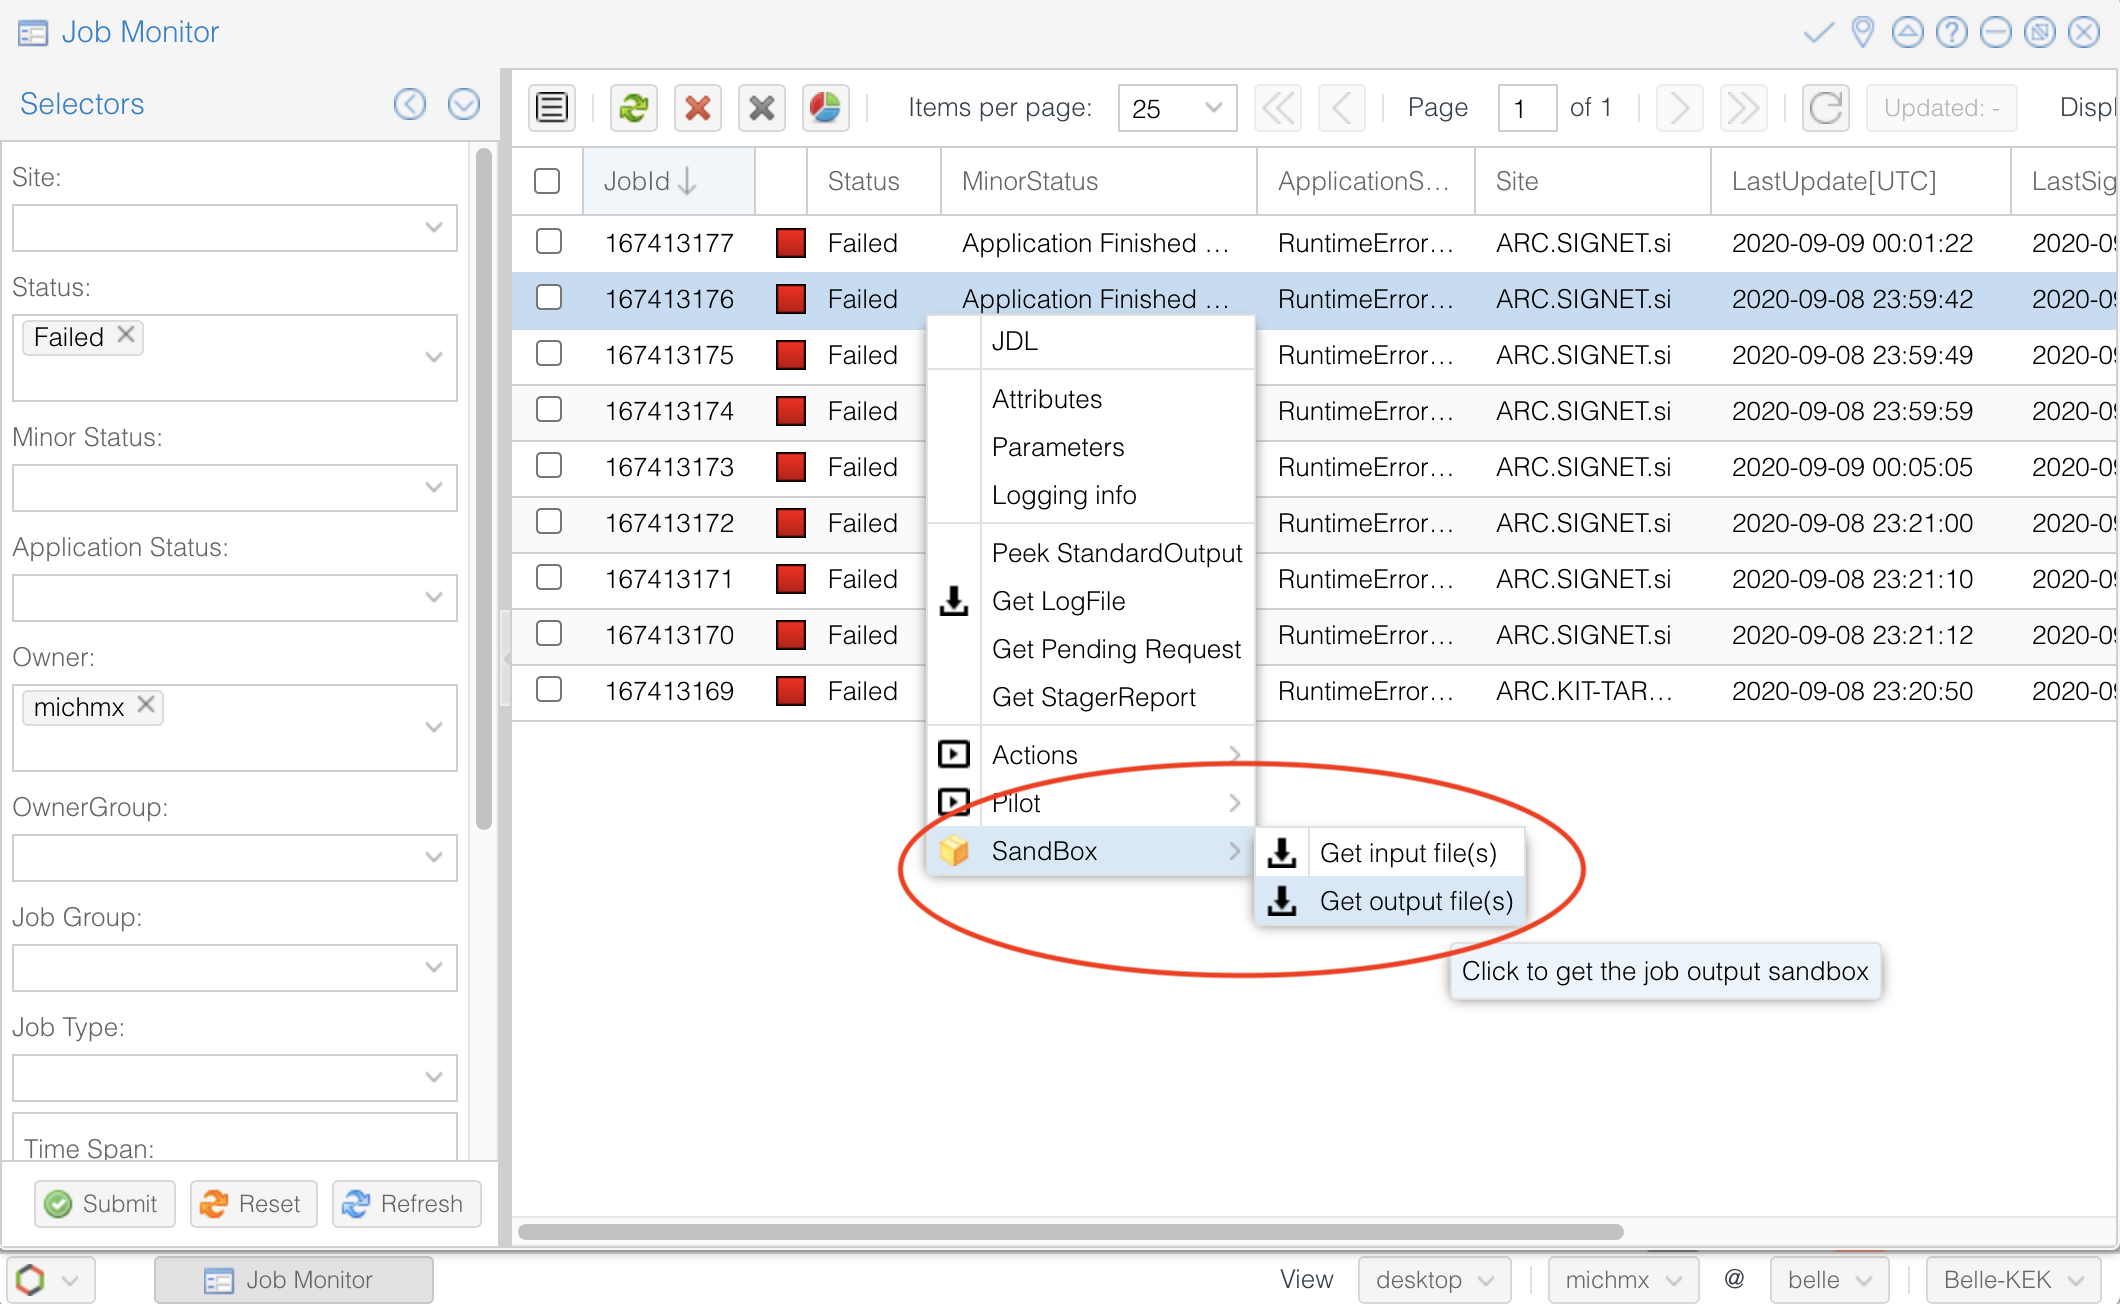
Fig. 3.35 How to download the output sandbox from the Job Monitor.#
It is also possible to retrieve the log files directly from the command line using gb2_job_output:
gb2_job_output -j 387165066

download output sandbox below ./log/JOBID
1 jobs are selected.
Please wait...
                           Result for jobs: ['387165066']
=====================================================================================
Downloaded: "Job output sandbox retrieved in /home/jbennett/log/387165066"
Exercise
Download the output sandbox of one of your jobs. Check what is inside.
Hint
One of the logs inside may look very familiar.
Solution
The file basf2helper.py.log contains the actual output of your basf2 steering file executed on the grid site.
Good practices#
To prevent many jobs failing and for your jobs to run faster, let’s summarize some good practices all analysts should do.
Please check that your code can run locally. While not completely foolproof, this will save you plenty of heartache (i.e. section above).
Lookout for new features (ex.
gb2_ds_get --newallows multithreaded download)Use collections when applicable. Develop skims for your benefit.
Consider b2luigi for automating some of the steps outlined above.
Properly setting CPU time for your jobs.
To prevent your jobs from being stuck in waiting caused by an overestimated CPU time, you can set either the
--cputime or the --evtpersec option. To figure out what number to set, enable the calculation of the processing
statistics by setting the argument calculateStatistics of the basf2.process function in your script to True.
Then run it on KEKCC and set your time to 20 * <total time on KEKCC in minutes>. Don’t forget to disable the statistics
calculation in your script again before submitting your jobs since the calculation is quite time-consuming and you
probably want to have your jobs finish as quickly as possible.
For details, see gbasf2’s section on CPU time. .
Where to go for help?#
The comp users forum is the main channel of communication related to issues with the grid. Feel free to ask every time that you need help.
The most useful place to find additional instructions and information about using gbasf2 is gbasf2.belle2.org.
Additionally, some pages at XWiki are prepared with additional information:
Take a look at the gbasf2 tutorials (they contain some advanced topics not covered here).
You can also ask in questions.belle2.org.
Stuck? We can help!
If you get stuck or have any questions to the online book material, the #starterkit-workshop channel in our chat is full of nice people who will provide fast help.
Refer to Collaborative Tools. for other places to get help if you have specific or detailed questions about your own analysis.
Improving things!
If you know how to do it, we recommend you to report bugs and other requests
with GitLab.
Make sure to use the documentation-training label of the basf2 project.
If you just want to give us feedback, please open a GitLab issue and add the label online_book to it.
Please make sure to be as precise as possible to make it easier for us to fix things! So for example:
typos (where?)
missing bits of information (what?)
bugs (what did you do? what goes wrong?)
too hard exercises (which one?)
etc.
If you are familiar with git and want to create your first merge request for the software, take a look at How to contribute. We’d be happy to have you on the team!
Quick feedback!
Do you want to leave us some feedback? Open a GitLab issue and add the label online_book to it.
Author of this lesson
Michel Villanueva, Justin Guilliams, Jake Bennett, Quinn Campagna, Tommy Lam